Three Fingered Jack Excursion: The Experience
Three Fingered Jack Excursion: The Experience
My friend Mark Shunk and I hiked Three Fingered Jack on August 10, 2022. The mountain is a 7,844 foot shield volcano formed during the Pleistocene epoch. It is one of a string of volcanoes running north to south through Oregon and Washington.
The peak is named after Jack Dunlop, an outlaw. Actually the name of the mountain is attributed to three different Jack Dunlop’s. All three were outlaws!
Our photo objective was to capture wildflowers at sunrise in the Canyon Creek Meadow area on the Northeast slope of the mountain.

Canyon Creek Meadow, Three Fingered Jack, Mt. Jefferson Wilderness, Oregon, USA, 2022
We left Bend at 3:00 am. We arrived at Jack Lake trailhead at 4:15 am. Civil twilight would happen at 5:32 am and sunrise would follow at 6:05 am. With headlamps lighting the path and gear laden backpacks serving as required ballast, we hiked the gradual uphill trail.
Important Note: This trail is in the Mount Jefferson Wilderness. If you plan to hike the Jack Lake trail, a permit is required. A parking pass is also required. You will find information about how to obtain a permit and parking pass on the US Forest site. Expect to see a ranger at the parking lot ready to confirm your permit and parking pass!
We ascended the trail at a steady pace. Douglas and alpine fir, blue spruce, and mountain hemlock trees populate the surrounding forest. Tall Bear Grass plants now void of their bushy white flowers line both sides of the trail.
We stopped in the lower meadow. Directly ahead a narrow view of the cragged peak was revealed in the predawn hours. There were some wildflowers here but we hoped the upper meadow would yield more. Astronomical twilight was transitioning to Nautical twilight. We could see stars in front of us but the East sky behind us was getting brighter. The glow provided a sense of urgency to keep moving. We marched on.
We arrived at the upper meadow towards the end of twilight and before sunrise.
When the volcano erupted long ago it blew out this northeast slope leaving behind a crater with one side shorter than the others and a big scooped out valley. An uphill gaze from the meadow revealed the ‘three fingered’ looking jagged peak. Flowing streams descended from above fed by snow melt. Each split into small tributaries running through the open meadow.
Canyon Creek Meadow is a wide open downhill slope with plenty of rocks, small plants including wildflowers and a few small stands of trees. Morning sunlight streams into the canyon striking the peak first and then sometime later striking the meadow. This can be problematic if the goal is to capture wide photographs with sky, peaks and foreground flowers. The difference between the bright light above and shadow light in the meadow makes it difficult to achieve a well-balanced exposure.
Wildflowers were not exactly abundant but those present were nice. Note to self: return in two to three weeks. The sky was void of clouds and hazy blue. This is not exactly a photographer's favorite condition.
We got to work first shooting wide and then as the sun rose higher we switched to more intimate compositions in full shade without a sky.
Like most of these adventures photo time moves quickly and before we knew it was over. We collected our gear and our thoughts. With the sun above the horizon we enjoyed the full 360 degree view. It was 6:30 am.
The day was young so we decided to hike (straight up) to the South saddle above us. The saddle is well below the actual mountain top. Standing on the crater rim we had a brides eye view of the turquoise crater lake that filled part of the crater. Beyond it was a spectacular view of Mt. Jefferson. To the South there were views of the Mount Washington, the Three Sisters and Broken Top. To the East the pyramid shaped Black Butte was silhouetted against the semi-blue sky.

Black Butte Pyramid 22169LND850BW, Three Fingered Jack saddle, Mt. Jefferson Wilderness, Oregon, USA, 2022
After a brief rest and a bunch of handheld long lens photos, we decided to descend the South face. The slope was mostly rock scree. At the bottom larger rocks would have to be negotiated.

Jack Sticks 22176NWND850BW, Three Fingered Jack saddle, Mt. Jefferson Wilderness, Oregon, USA, 2022
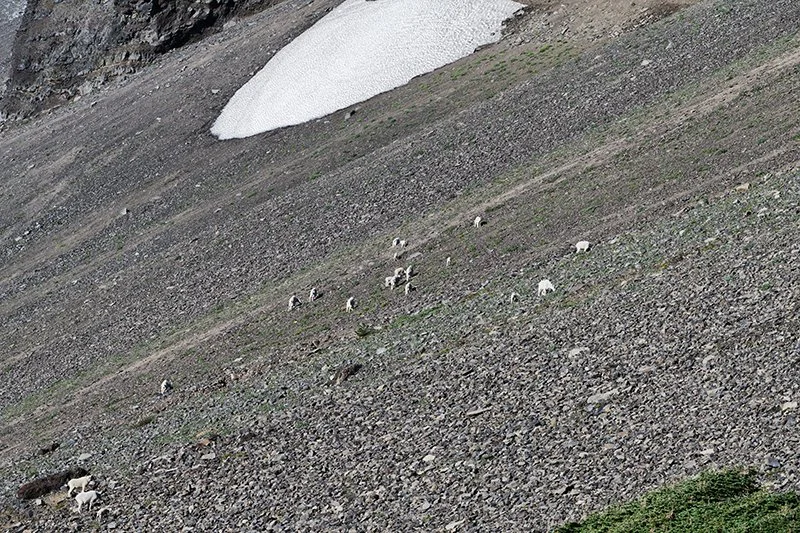
As we descended there they were! A herd of white mountain goats dotted the West slope. They were gazing their way up the steep mountainside. I counted about twenty-five adults and kids in the herd. Out came the long lenses and 2x converters. The 400 mm just wasn’t enough but the shutter kept clicking anyway.

Excited about our lucky encounter we began the long slog back to the trailhead. Unless there was some mid-morning spectacular scene along the way, the photo gear was merely heavy ballast until we reached the car.
Our route took us through some uncharted terrain without a trail. As we picked our way towards the established trail we suddenly heard a loud noise. Immediately my brain perceived the noise as that of a herd of horses or cattle. When we looked up we saw a herd of 30 or more elk! Clearly they weren’t expecting us and we weren’t expecting them. Off they ran leaving a cloud of dust and two photographers a bit stunned. We didn’t even have a chance to reach for our cell phone cameras!
What a morning! Each outing is a new and different experience. Each is unique and memorable. I’m ready for the next one.
Thank you for taking the time to read my muse. I do appreciate your interest and support. If you enjoy these blogs, please point family and friends to them. Even better encourage them to subscribe to the Newsletter. This is the best way to help support my efforts.
Cheers
Steve
P.S. If you are a photo enthusiast read on. I provide a review of three images taken on this trip. Get information about the objective and intent, the exposure, and the post process edit workflow.
+++++++++++++++++++++++++++++++++++
PHOTO ENTHUSIAST TECH TALK
My Photography Work Flow: Forethought, Objective & Outcome
During photo classes, workshops and tours I often talk about my approach to photography. The discussion often includes topics like; story telling, conscious composition and pre & post visualization. More times than not participants are surprised that I spend as much energy as I do contemplating specific photo objectives and fastidious techniques in pursuit of a specific creative outcome.
The fact is my workflow is centered on a set of questions I ask myself. The questions help me get the most out of every photo outing. So here are the questions that drive my cognitive and technical workflow. In general, they are ordered.
What is my photo objective? I typically conjure a story I want the image to tell and/or a mood or feeling I want it portray. For instance, I may want an intimate autumn image to encourage a sense of calm and peacefulness.
What is the best composition to achieve the objective? This step requires some conscious thought. For instances; if the goal is to create an image that evokes a sense of adventure and solitude, it makes sense to compose a landscape photo with wide vistas with no people, roads, or human influence.
What camera exposure will help achieve the objective? Crafting an exposure that matches the objective makes the editing process so much easier. For example, if the objective is to create an uneasy dramatic storm scene, underexposing (left shifting darker histogram) the image a bit would help. Other conscious exposure settings might include; a slow shutter speed in hopes of capturing cloud smear or lightening, a smallish aperture to be sure both the foreground and horizon has maximum detail.
Finally, what is my vision of the final edit? What post processing edits will enhance the intended story? For example, if the objective is to create a warm and intimate wildflower landscape image, it is best to add some red, orange and yellow, decrease shadow blues, and maybe decrease the contrast and increase the brightness to soften the scene.
Three Fingered Jack Image Review
The weather and light conditions during the Three Fingered Jack photo outing were not ideal. A low light landscape scene with abundant wildflowers, an opportunity for long exposure flowing water and mountain background with clouds just wasn’t possible. So I went with Plan B and C. Frankly none of the images are likely to become part of my creative portfolio.
Image #1: Canyon Creek Meadow Photo
Photo Description: A low angle vertical photo of a foreground stream, mid ground stand of trees, and background mountain wall with only a hint of sky. I am not a fan of vertical landscape images. However, the available light dictated the need.
Photo Story & Composition: I decided I would do my best to represent the meadow as a vibrant but somewhat desolate place. It was important to me to create a tack sharp image from front to back that encouraged the viewer to explore the canyon one inch at a time to the top of the frame. The smooth water created by the long exposure would soften the image without eliminating the sense of ruggedness.

Camera, Lens & Exposure: Nikon D850, Nikon 24-70mm f/2.8 @ 24mm, 0.4 seconds, f/11, ISO 64.
The light was already getting pretty bright and contrasty. Because my intent was to both create a full depth image and represent the water as smooth, I elected to combine a small aperture with a low ISO (64). The combination resulted in a shutter speed of a 1/4 second. I could have used a smaller aperture, say f/18 allow for an ISO of 100 but I knew this lens was most sharp at f/11.
NOTE: Be aware using ISO’s below the camera’s native ISO, generally ISO 100, will result in higher contrast images with less dynamic range. For example, using ISO’s L0.3, L0.7 & L1.0 offered on some cameras, can be problematic. Be prepare to decrease sharpness and contrast during post processing. There are some cameras that have native ISO of 80 or even 64. Read your manual.
I wasn’t enamor with the composition and didn’t expect it to be ‘keeper’. Since I was low to the ground and the foreground started literally at my wet boots, I decided to exercise the in-camera focus shifting feature. Doing so would also obligate me to practice image merging or blending during post processing. Alternatively I could have used my hyperlocal chart to calculate settings to achieve a tack sharp front to back image.
Using focus shifting requires selecting the number of shots to be taken and the step distance between each shot among other sub settings depending on the camera. The camera is pretty smart and will take less images than you set if fewer will achieve the same goal. Selecting a short step width (distance between shots usually in feet) is a good idea. This assures the camera will select enough subjects from foreground too background to get a smooth focus blend. In the end if during your review there are duplicates in the series of images, you do not have to use them all in the post process editing.
Field Tip #1: Place your hand in front of the lens and click the shutter before setting the cameras focus shifting parameters. When you start the feature most cameras will shot the entire series automatically and then stop. Confirm the camera is done and then place your hand in front of the camera and click the shutter. This adds ‘bookends’ or start and stop references. This is helpful during the editing process. Alternatively you could write down the first and last camera assign frame numbers to the set of images!
Field Tip #2: Remember, if there is anything moving in your frame i.e. trees, bushes, etc., the software will not be able to accurately merge a series of photos. You will likely end up with some ‘ghosting’ in the image.
Edit Process: This final image consists of four frames merged as an HDR (high dynamic range) single photo. The LR editing process goes like this.
Import the series of images into your LR library.
Select the first image and make histogram driven global edits i.e. exposure balancing & major shadow and highlight adjustments.
Copy these adjustments and apply them to the other frames in the series. Go to the SETTINGS tab >>> Select COPY SETTINGS. Select the second image … Got to SETTINGS tab >>> Select PASTE SETTINGS. Repeat for all images. You may be able to paste to the whole series by selecting all but the first image in the series.This will give all images a similar exposure making merging more consistent.
Select all images in the series (CTRL A on MAC).
Go to PHOTO tab >>> select PHOTO MERGE >>> select HDR. The software will merge the images and give you a preview. I recommend accepting the other default choices on the next screen. Then click MERGE. Remember if the result isn’t what you expected you can undo then change your merge submenu choices and try again.
Once the merged (be patient if your computer is under powered, it may take a bit of time), edit the merged file using the global, regional and detail workflow (follow the LR menu from top to bottom).
Editing Goals:
The primary goal was to make sure the image sharp from front to back using the focus shifting camera feature. The camera and LR accomplished this nicely.
The next goal was to balance the very bright background with the darker foreground. I was unwilling to brighten the foreground very much. That meant decreasing the brightness of the background. The final histogram is a bit left shifted but details are visible in both the shadows and highlighted areas.
Remember, shadows are blue and highlights are red, yellow and orange. In this image these tones were very exaggerated. It took some wok to bring them into relative balance. More times than not the solution is to decrease, not increase, the saturation of individual colors.
I did decrease the contrast in the image.
This is not a portfolio image but the final edit conveys what I intended.
Image #2: Black Butte Pyramid 22169LND850BW
Photo Description: Sneak peek of pyramid looking Black Butte from the saddle of Three Fingered Jack (7,844 '), Mount Jefferson Wilderness, Oregon, USA. The foreground is partially obscured by the side of foreground slope. The image is in black and white.
Photo Story & Composition: The photo objective was to create a high altitude backcountry wilderness perspective. The combination of the foreground slope and Black Butte in the mid ground was intended to add interest and scale. A black and white tone was chosen to force the eye to see the contours of the landscape.

Camera, Lens & Exposure: Nikon D850, Nikon 70-200mm f/2.8 @ 70mm, 1/100 seconds, f/16, ISO 200.
This was a hand-held shot and therefore I took the image using shutter priority. A 1/100 second shutter speed is my self-imposed minimum. I did want a deep depth of field hence the f/16 aperture choice. From experience this aperture works well on the 70-200mm Nikon f/2.8 lens. ISO 200 rounded out the exposure triangle settings.
I exposed for the highlights. I was willing to allow the foreground to be dark if necessary. I didn’t plan to edit for cloud detail, but I did want low contrast cloud outline to be in the final image. I focused on the tree at the bottom of the frame.
Edit Process: Several photo editing programs were used to create the final file; PhotoLab5, NIK Silver Efex Pro3, Photoshop & TK actions.
The starting and ending histogram are very similar and mimicked my final vision of a layered full tone black and white image. My philosophy is to expose using the histogram and imagine the final photo as I take it. A well-managed field exposure that yields a well-balanced histogram makes editing so much easier!
Editing Goals:
Create a structured but not to contrasty image with a dark foreground. Allow progressive softening - low contrast - mid ground and background.
Make visible sky cloud detail with soft contrast only. Adding too much detail (read - no dehaze added) would have been inconsistent with the rest of the image and photo objective.
Make sure the image has a full range of blacks, whites and gray. It is all about varying degrees of black, white and gray tones that give the image interest.
Make the foreground trees stick out. I added sharpness and contrast only to these trees. Again adding this edit to the whole image would have undermined my final vision.
Other edits I made to this file. (a) I darken the midtown grays so the distant hills had depth, (b)
Image #3: Jack Sticks 22176NWND850BW
Photo Description: A south view of a previously burned area of the Mount Jefferson Wilderness near the Three Fingered Jack, Oregon, USA. The image excludes the sky and the scene is compressed using a telephoto lens. The image is in black and white.
Photo Story & Composition: The objective of this photo was to give the viewer a bit of an uncomfortable feeling about the destruction of wildfires. The photograph is framed so that live and death trees are juxtaposed from the bottom of the frame to the top and from the left side to the right, full frame! I wanted the landscape to look and feel barren and exhausted. I felt a stark black and white image would exaggerate the feeling of destruction and make it feel isolated.

Camera, Lens & Exposure: Nikon D850, Nikon 70-200 mm f/2.8 @ 116 mm, 1/320s, f/6.3, ISO 200.
I choose the long lens to compress the scene and add impact. I took the image standing, hand-held hence the 1/320 second shutter speed. The f/6.3 aperture was intentional. I focused near the bottom of the frame. I felt the sharp foreground with progressive ‘fall off’ of sharpness might force the viewer to look deeper and more closely.
The beginning and ending histogram for this image are close to the same. Both are a bit left leaning. Some of the shadows lack detail intentionally. I really wanted a stark, contrasty looking photo. I would need to brighten the file (push the histogram to the right) if I intended to print it.
Editing Process: This image was first edited globally in DXO PhotoLab 5. This software is much like Adobe Camera Raw, but better in my opinion. Once global edits were complete I used NIK Silver Efex Pro 3 to convert and edit as a black and white image. Finally, it was exported to Photoshop where I created several layers to tweak contrast, mid tones and more.
As mentioned above the overall editing goal was to create a stark, contrasty image that makes the viewer a little uncomfortable once the subject matter is realized. I also added a minor, circle darkening vignette to force the eye to the center of the image. My hope is that the viewer will then bounce around inside the frame.
Summary
It is always a good idea to critically review your own work and that of other photographers. Take some time to do this. Don’t use the Facebook, Instagram, etc. half a second look! Ask yourself what do I like about it and what don’t I like. The process will make you a better photographer. So, I am open to your comments, suggestions, ideas and constructive criticism.
I do offer group and individual photo coaching. I also offer individual photo editing lessons. Send me an email steve@giardiniphotography.com or call 480-204-3109 if you are interested.
Cheers
Steve