Trees of Cherry Hinton Hall Park Plus
Trees of Cherry Hinton Hall
Cherry Hinton Hall Park is located towards the Southeast end of Cambridge, England.
A Victorian country house with 10 bedrooms and 4 reception rooms sits in the middle of the property. Built in the 1830’s by John Okes, the mansion and the surrounding property is now owned and managed by the Cambridge City Council. Repurposed in 2007, the mansion is the home of the Oaks International Preparatory School. The surrounding property has been preserved as a public park.
While the old mason is an interesting structure, it is the nearly fifty old trees on the 12 hectare (30 acre) park property that attracted my eye. These magnificent trees are a treasure for sure.
One May evening I walked a portion of the park with others. A stroll along the network of quaint walkways leading from tree to tree is a perfect way to end, or begin, a day. I was so delighted with the beautiful old trees I returned the next morning at sunrise to take photographs.
The morning was clear and the early summer sun was streaking through the trees at an oblique angle. Toting my camera backpack and tripod I worked my way through the park. In some photos I used the sun as backlighting, in others it served to side light the subject, and in still other scenes the sun was front and center.
Click on an image below and scroll through the bunch.
I took some photographs from a distance so that the entire tree filled the frame. But for most images I selected a portion of a tree. Final compositions had more to do with highlighting a particular characteristic and feature of a particular tree and less about documenting a tree type.
For example, the composition titled Standout, a Corstorphine Plane tree, is a photo of the entire tree taken from a distance. What struck me about the tree was its shape. The pear shaped tree sprouts from a single, mostly smooth tree trunk. Close inspection shows multiple upright internal branches encouraging the symmetrical shape. Tree shape won the photo day!
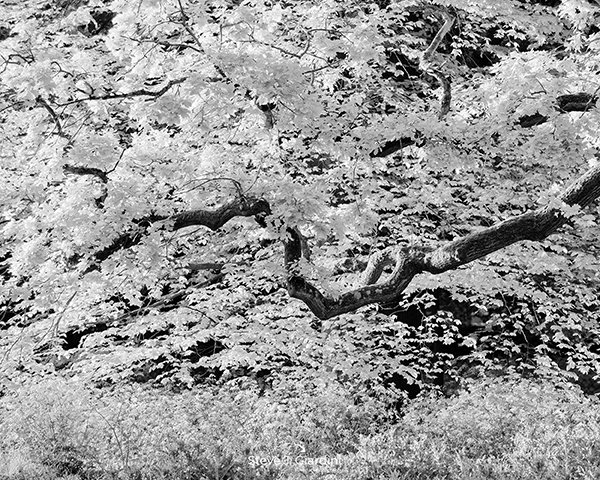
In the image Limb Convergence, a Horse Chestnut tree, I was taken by the network of tangled tree branches. It was these twisted branches entering and exiting from all sides that pulled me in close. By only revealing a portion of the tree, my hope is that the viewer will be prompted to ask, Are all the branches connected? Are they all from the same tree? Where do they originate and end?
Here is one final example of what attracts me to a composition. As I walked by a beautiful old English Oak tree (image titled Oak Sharp) I was struck by brightness of its leaves compared to other trees. I noticed that against the dark backdrop individual oak leaves looked exceptionally crisp and well-defined. So I used this light-dark contrast to my advantage. To my eye despite the busy background, the oak tree stands dominate in the frame.
See if you can imagine what might have attracted me to the composition in the other photos.


You might be asking, why process natural world images in black and white? The answer, I was not attracted to the these trees because of their color. It was their shape, form and texture that made me lean in. It was the light versus dark contrast. It was the challenge of creating an interesting photograph by deciding what to include as well as what to exclude!
If you hadn’t noticed I choose to format these photographs in a 5 to 4 aspect ratio rather than the typical 3 by 2 ratio. This means the images are more square rather than rectangular. For me this format makes the image more intimate, more singularly focused.
All of these images are available for purchase on archival Hahnemuhle fine art paper. If sustainable paper interests you, contact me. Hahnemuhle offers agave, bamboo, hemp and sugar cane options.
NOTE: I am by no means a tree expert. I used the park’s Tree Trail guide to identify the trees. I believe I correctly identified the trees. If you think otherwise, let me know. I’d love to get it right.
Here is some information about Cherry Hinton Hall Park you may enjoy.
Cambridge City Government Website:
About Cherry Hinton Hall Park
Walking Tree Trail Guide (pdf), Drone View Video, Interactive Mobile Tree Trail Guide
Other Related .com Website Resources:
Learn how to edit photographs like a pro. Now offering Adobe Lightroom and Photoshop editing sessions.
Tech Talk: Exposure & Edit Insights (For Photo Enthusiasts)
Editor Tip: When editing a black and white photograph consider this. Adding a red, orange, yellow, green or blue filter, in the field or during editing the editing process, enhances some colors while subduing others.
For example, if a yellow filter is added to an image with an abundance of yellow or light green (like tree leaves), these colors will become much brighter, more enhanced. On the other hand, if an orange filter is added to a photo with a blue sky, the blue sky will become less bright. Taken to the extreme this orange filter can render the blue sky black. Conversely, using a blue filter on a blue sky will lighten the sky making it much brighter.
When editing black and white images the color filter theory applies similarly. Adding a color filter during the field capture or afterwards during the editing process can enhance specific shades of gray and/or image contrast.
Photo Review
Image #1: Cambridge Reach 22202NWND850BW_5x4

Exposure: Nikon D850, Nikon 70-200 f/2.8 @ 185mm, 1/160s, f/5.6, ISO 400
Editing Software: DXO PhotoLab 5, NIK Silver Efex Pro 3, Adobe Photoshop, TK Actions
Composition Goal: Use texture, contrast, bright whites and dark blacks to create an image that requires the viewer to investigate more closely the subject and the details. I choose to use the tree limb as ‘way into’ the frame.
Editing Objective: The edit goal was to exaggerate bright and dark without losing detail at both ends of the histogram. I used a yellow filter in NIK Silver Efex Pro 3 to brighten the yellow-greens of the leaves. This yellow filter also darkens the opposite colors of violet, some blues and some reds.
I also darken the deepest blacks and increased the brightness of the mid-tones shifting the histogram to the right. See the larger high resolution version here.
Image #2: Flowering Tree 22204NWND850BW_5x4
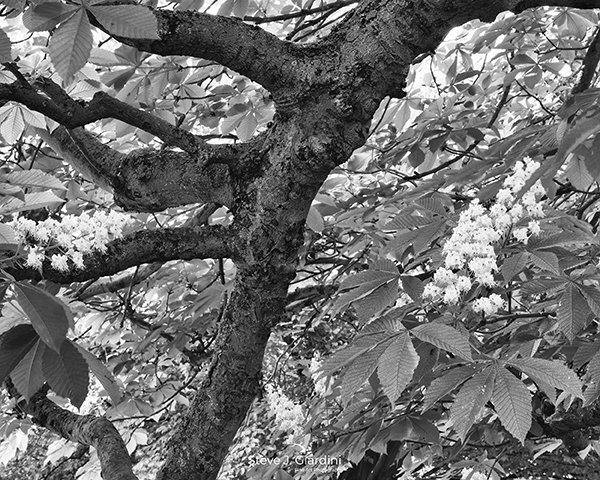

Exposure: Nikon D850, Nikon 24-70 f/2.8 @ 70mm, 0.4s, f/13, ISO 400
Editing Software: DXO PhotoLab 5, NIK Silver Efex Pro 3, Adobe Photoshop, TK Actions
Composition Goal: Use detail and light contrast to simplify a chaotic scene. I wanted the tree branch and flowers with its broad leaves to be front and center. The challenge was composing and editing the background in a way that compliments but does not distract from the photo.
Editing Objective: To make sure a full tonal range was included with detail throughout. For instance, make sure the dark spots on tree limb, the gray of the leaves and whiteness of the flowers all had distinct shades of black and white.
In the histogram below the spike in highlights represents the sun sneaking through just below the branch in the top right of the frame. I choose not compensate for this as it makes the branch edge more sharp and contrasty. Like the image above I used a yellow filter in NIK Silver Efex Pro 3 to brighten the yellow-white flowers. This yellow filter darken the opposite colors including some of the red-magenta of the branch wood.
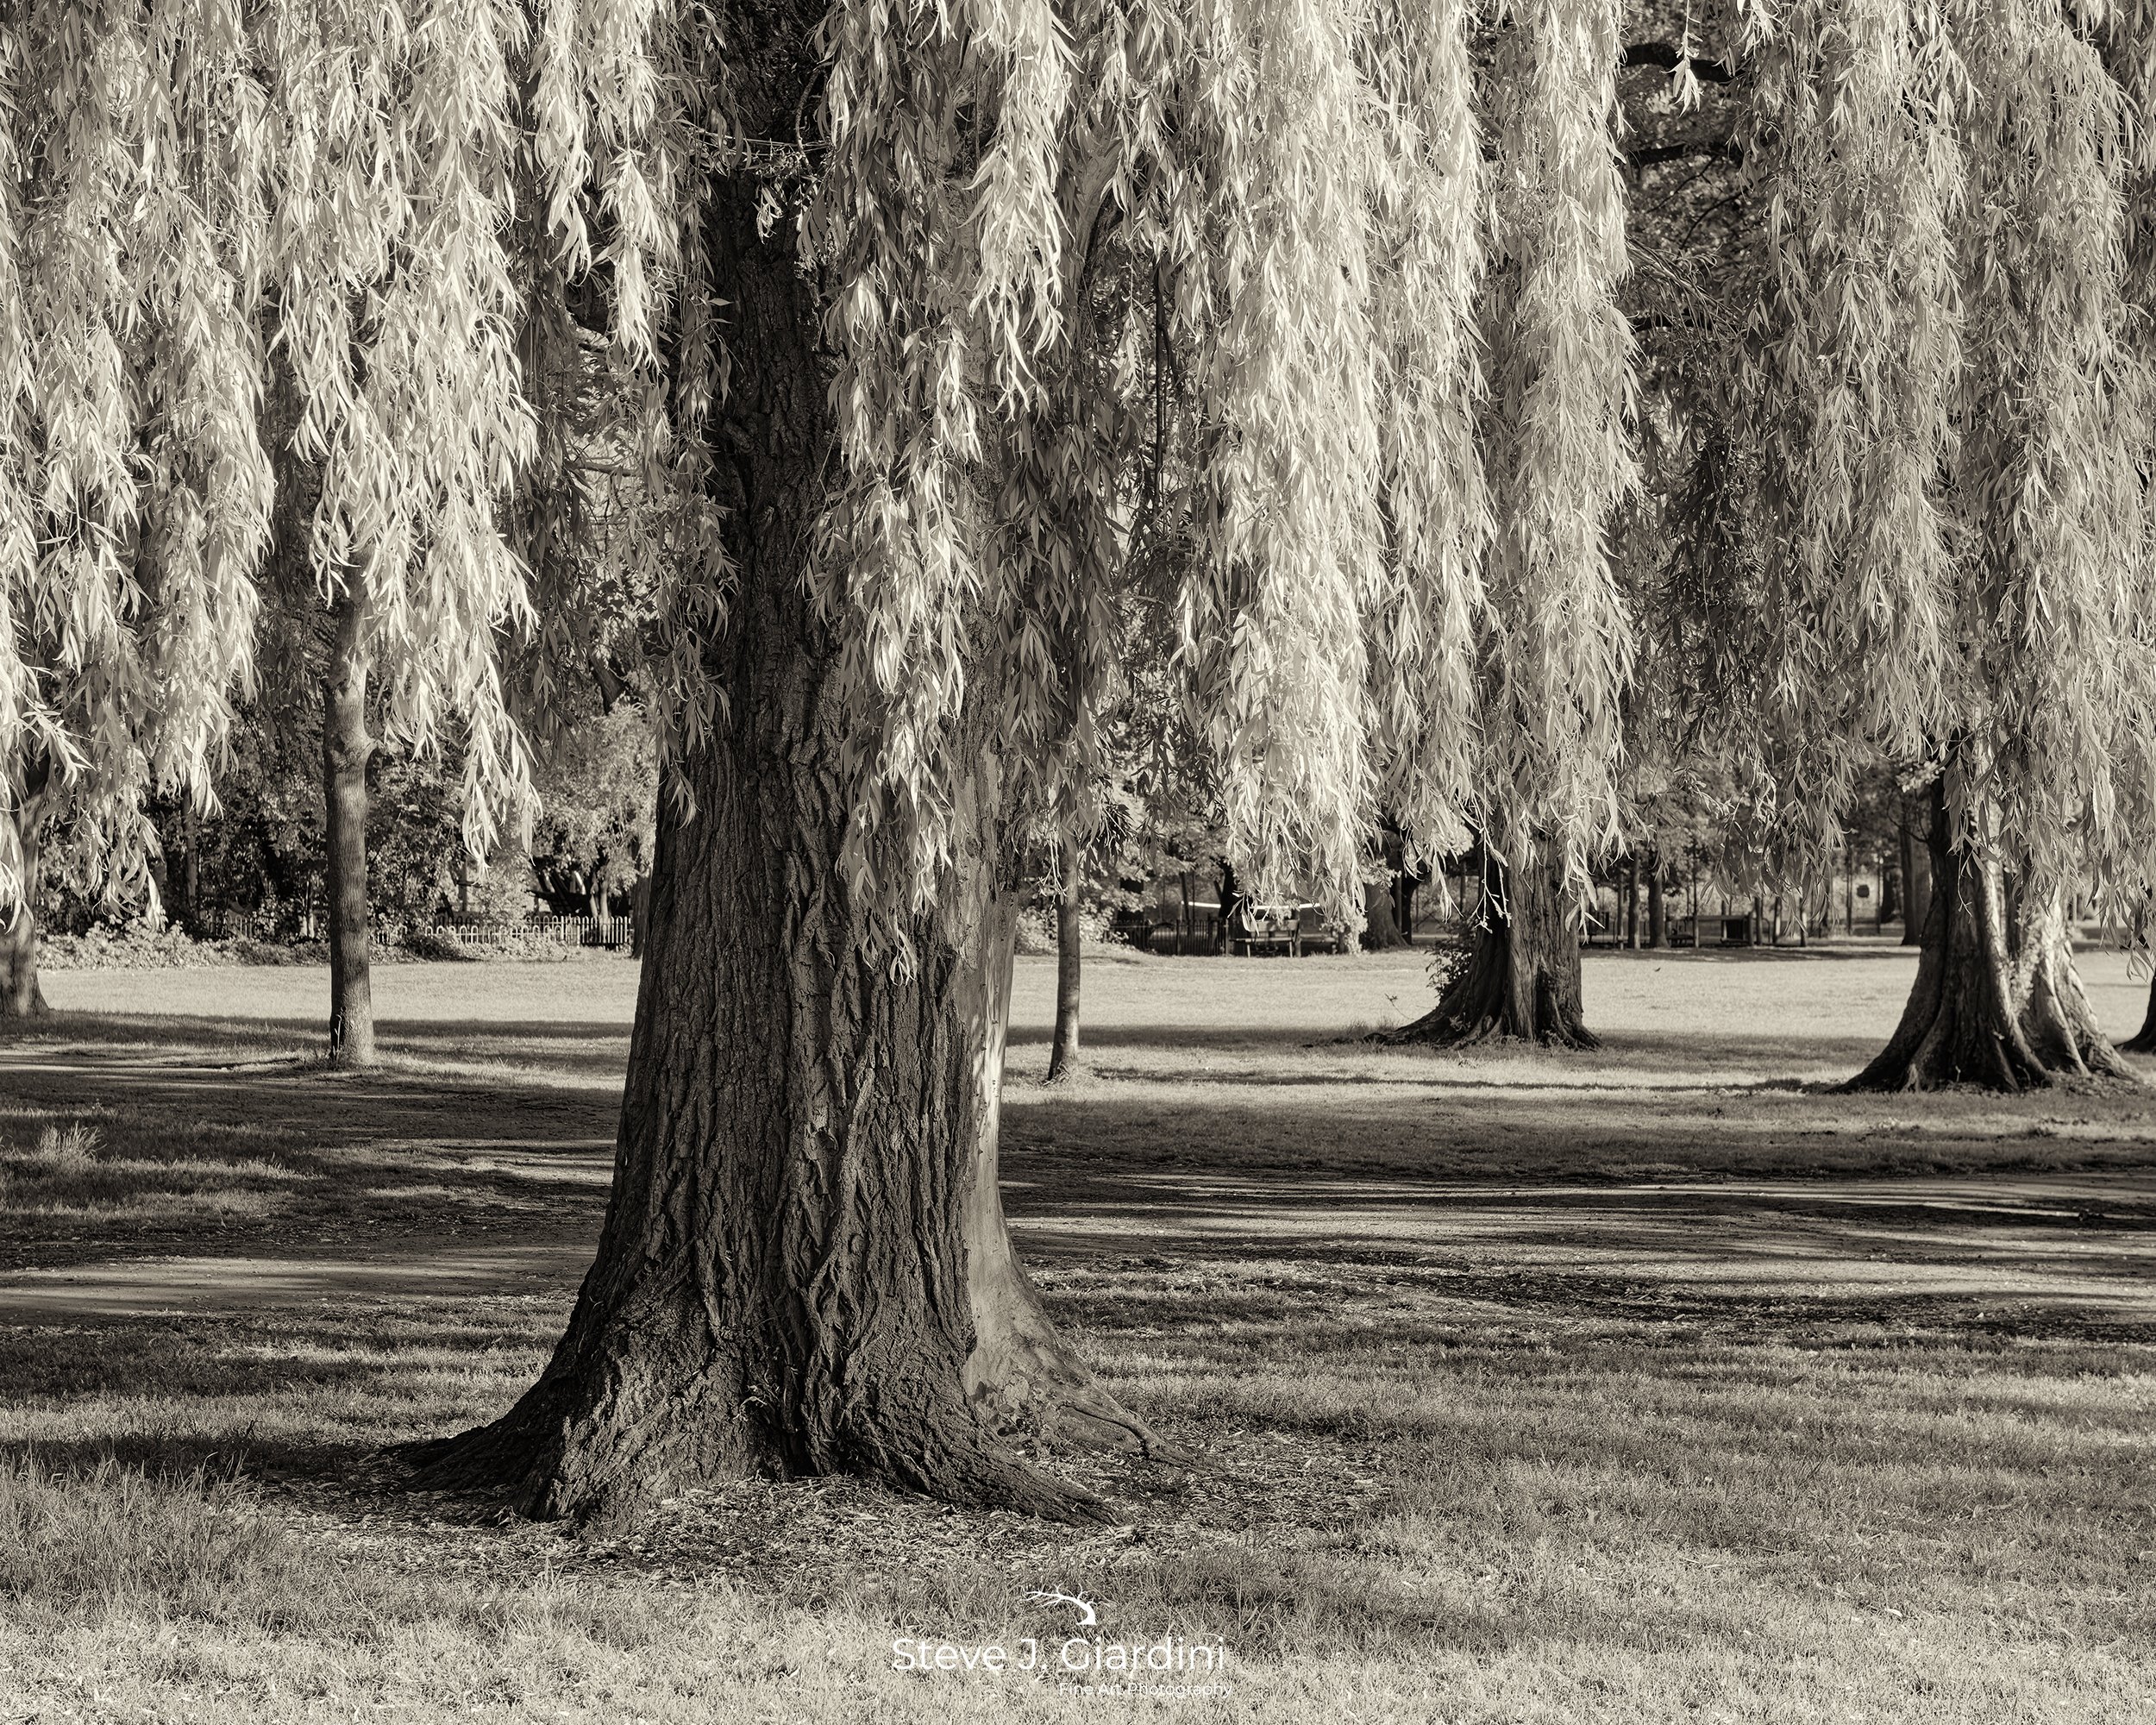
Image #3: Hinton Hanging 22212NWND850_5x4_sepia


Exposure: Nikon D850, Nikon 24-70 f/2.8 @ 62mm, 1/200s, f/6.3, ISO 400
Editing Software: DXO PhotoLab 5, NIK Silver Efex Pro 3, Adobe Photoshop, TK Actions
Composition Goal: I wanted the tree foliage to appear as a curtain revealing only the tree trunks. I though repetition might give this image depth. Even though my f-stop was only f/6.3, most of the background is discernible. Sharpness of the foreground tree was critical.
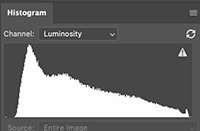
Editing Objective: The leaves on these weeping willows were bright green-yellow. I used a red filter in NIK Silver Efex Pro 3 to both darken the tree trunks and brighten the green-yellow leaves. You can see from the luminosity histogram below I managed to get a full range of black and white tones without losing any detail at either end of the luminosity range.
Oh yea, I decided to sepia tone this image. I felt it would help exaggerate tree trunk texture and warm the scene.
Image #4: Limb Convergence 22210NWND850BW_5x4
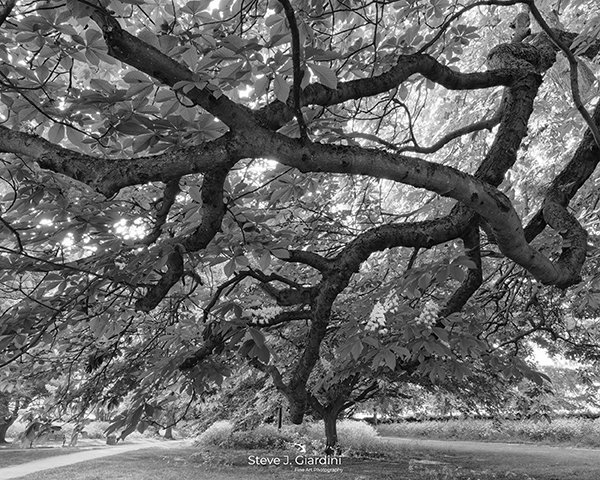

Exposure: Nikon D850, Zeiss Milvus 18mm f/2.8, 1/5s, f/20, ISO 400
Editing Software: DXO PhotoLab 5, NIK Silver Efex Pro 3, Adobe Photoshop, TK Actions
Composition Goal: I was taken by the network of tangled tree branches. It was these twisted branches entering and existing in front of me that attracted my attention. I purposefully excluded the origin of the branches. I wanted the viewer to think about where the branches were coming form and if they all connected originating from a single source. I also felt the path on the left and corresponding bright strip on the left made a nice arrow to follow.
Editing Objective: I really like this image! It was important to me to preserve as much detail and tonal range as possible. I used the Milvus 18mm lens and a f-stop was f/20. This lens is exceptionally sharp and the f/20 provided maximum depth of field.
As you can see from the histogram it is skew to the left a bit to prevent blown out highlights from the sun peaking through in the top middle of the frame. If you zoom in you will see that there is detail in every portion of the tree branch and in the brightest spots along the path. The photo has full tonal range in my humble opinion.
Despite my best efforts to carefully level this shot to prevent bending scene elements, in the end I had to use DXO Perspective to ‘unbend’ the walking path, etc.
Image #5: Oak Sharp 22214NWND850BW_5x4


Exposure: Nikon D850, Nikon 70-200 f/2.8 @ 80mm, 1/50s, f/5.6, ISO 400
Editing Software: DXO PhotoLab 5, NIK Silver Efex Pro 3, Adobe Photoshop, TK Actions
Composition Goal: As mentioned in the main text, I was struck by brightness and edge sharpness of the oak tree leaves. I knew the success of this image depended on separating the oak tree from its background. The tree leaves would have to shine bright and be the first thing the viewer was attracted too. I knew the leaves would have to look extra sharp on close inspection to keep the viewer in the frame. So I used this light-dark contrast to my advantage. To my eye despite the busy background the oak tree stands dominate in the frame.
I choose an f/5.6 aperture to soften the background and a shutter speed of 1/50 second in case a light breeze came along during the exposure.
Editing Objective: By now you probably guessed I used a yellow filter in NIK Sliver Efex Pro 3 to bring out the highlights of the oaks leaves. I was careful to zoom in as I brought up the brightness. I did not want to lose any of the detail in these highlights. I decreased the mid-tones a bit but was careful not to push the shadows to the left to far. I darken them but as you can see in the histogram, I made sure I still maintained some detail even in the darkest shadows.
Image #6: Standout 22211NWND850BW_4x5


Exposure: Nikon D850, Nikon 70-200 f/2.8 @ 78mm, 1/250s, f/5.6, ISO 400
Editing Software: DXO PhotoLab 5, NIK Silver Efex Pro 3, Adobe Photoshop, TK Actions
Composition Goal: As mentioned in the main text, what struck me about the tree was its shape. I wanted to exaggerate this shape against the background. Although I used a f/5.6 aperture, the background did not blur as much as I had hoped. I composed the image so that the tree trunk was prominent and my position exaggerated the half lifer, half shadow look. I also liked the bright diagonal light stripe across the grass.
Editing Objective: As is clear from the histogram this image was an exposure challenge. I wanted to show the tree as half bright and half dark, right versus left sides. As I began the edit process I simply ignored the sky. There was no detail there and a white sky actually helped to make the top of the tree crisp and sharp. I worked hard to keep some detail in the tree trunk and the grass light stripe. It was important to see detail on the shadowed (left) side of the tee. I choose to sepia tone the image to warm it up a bit.
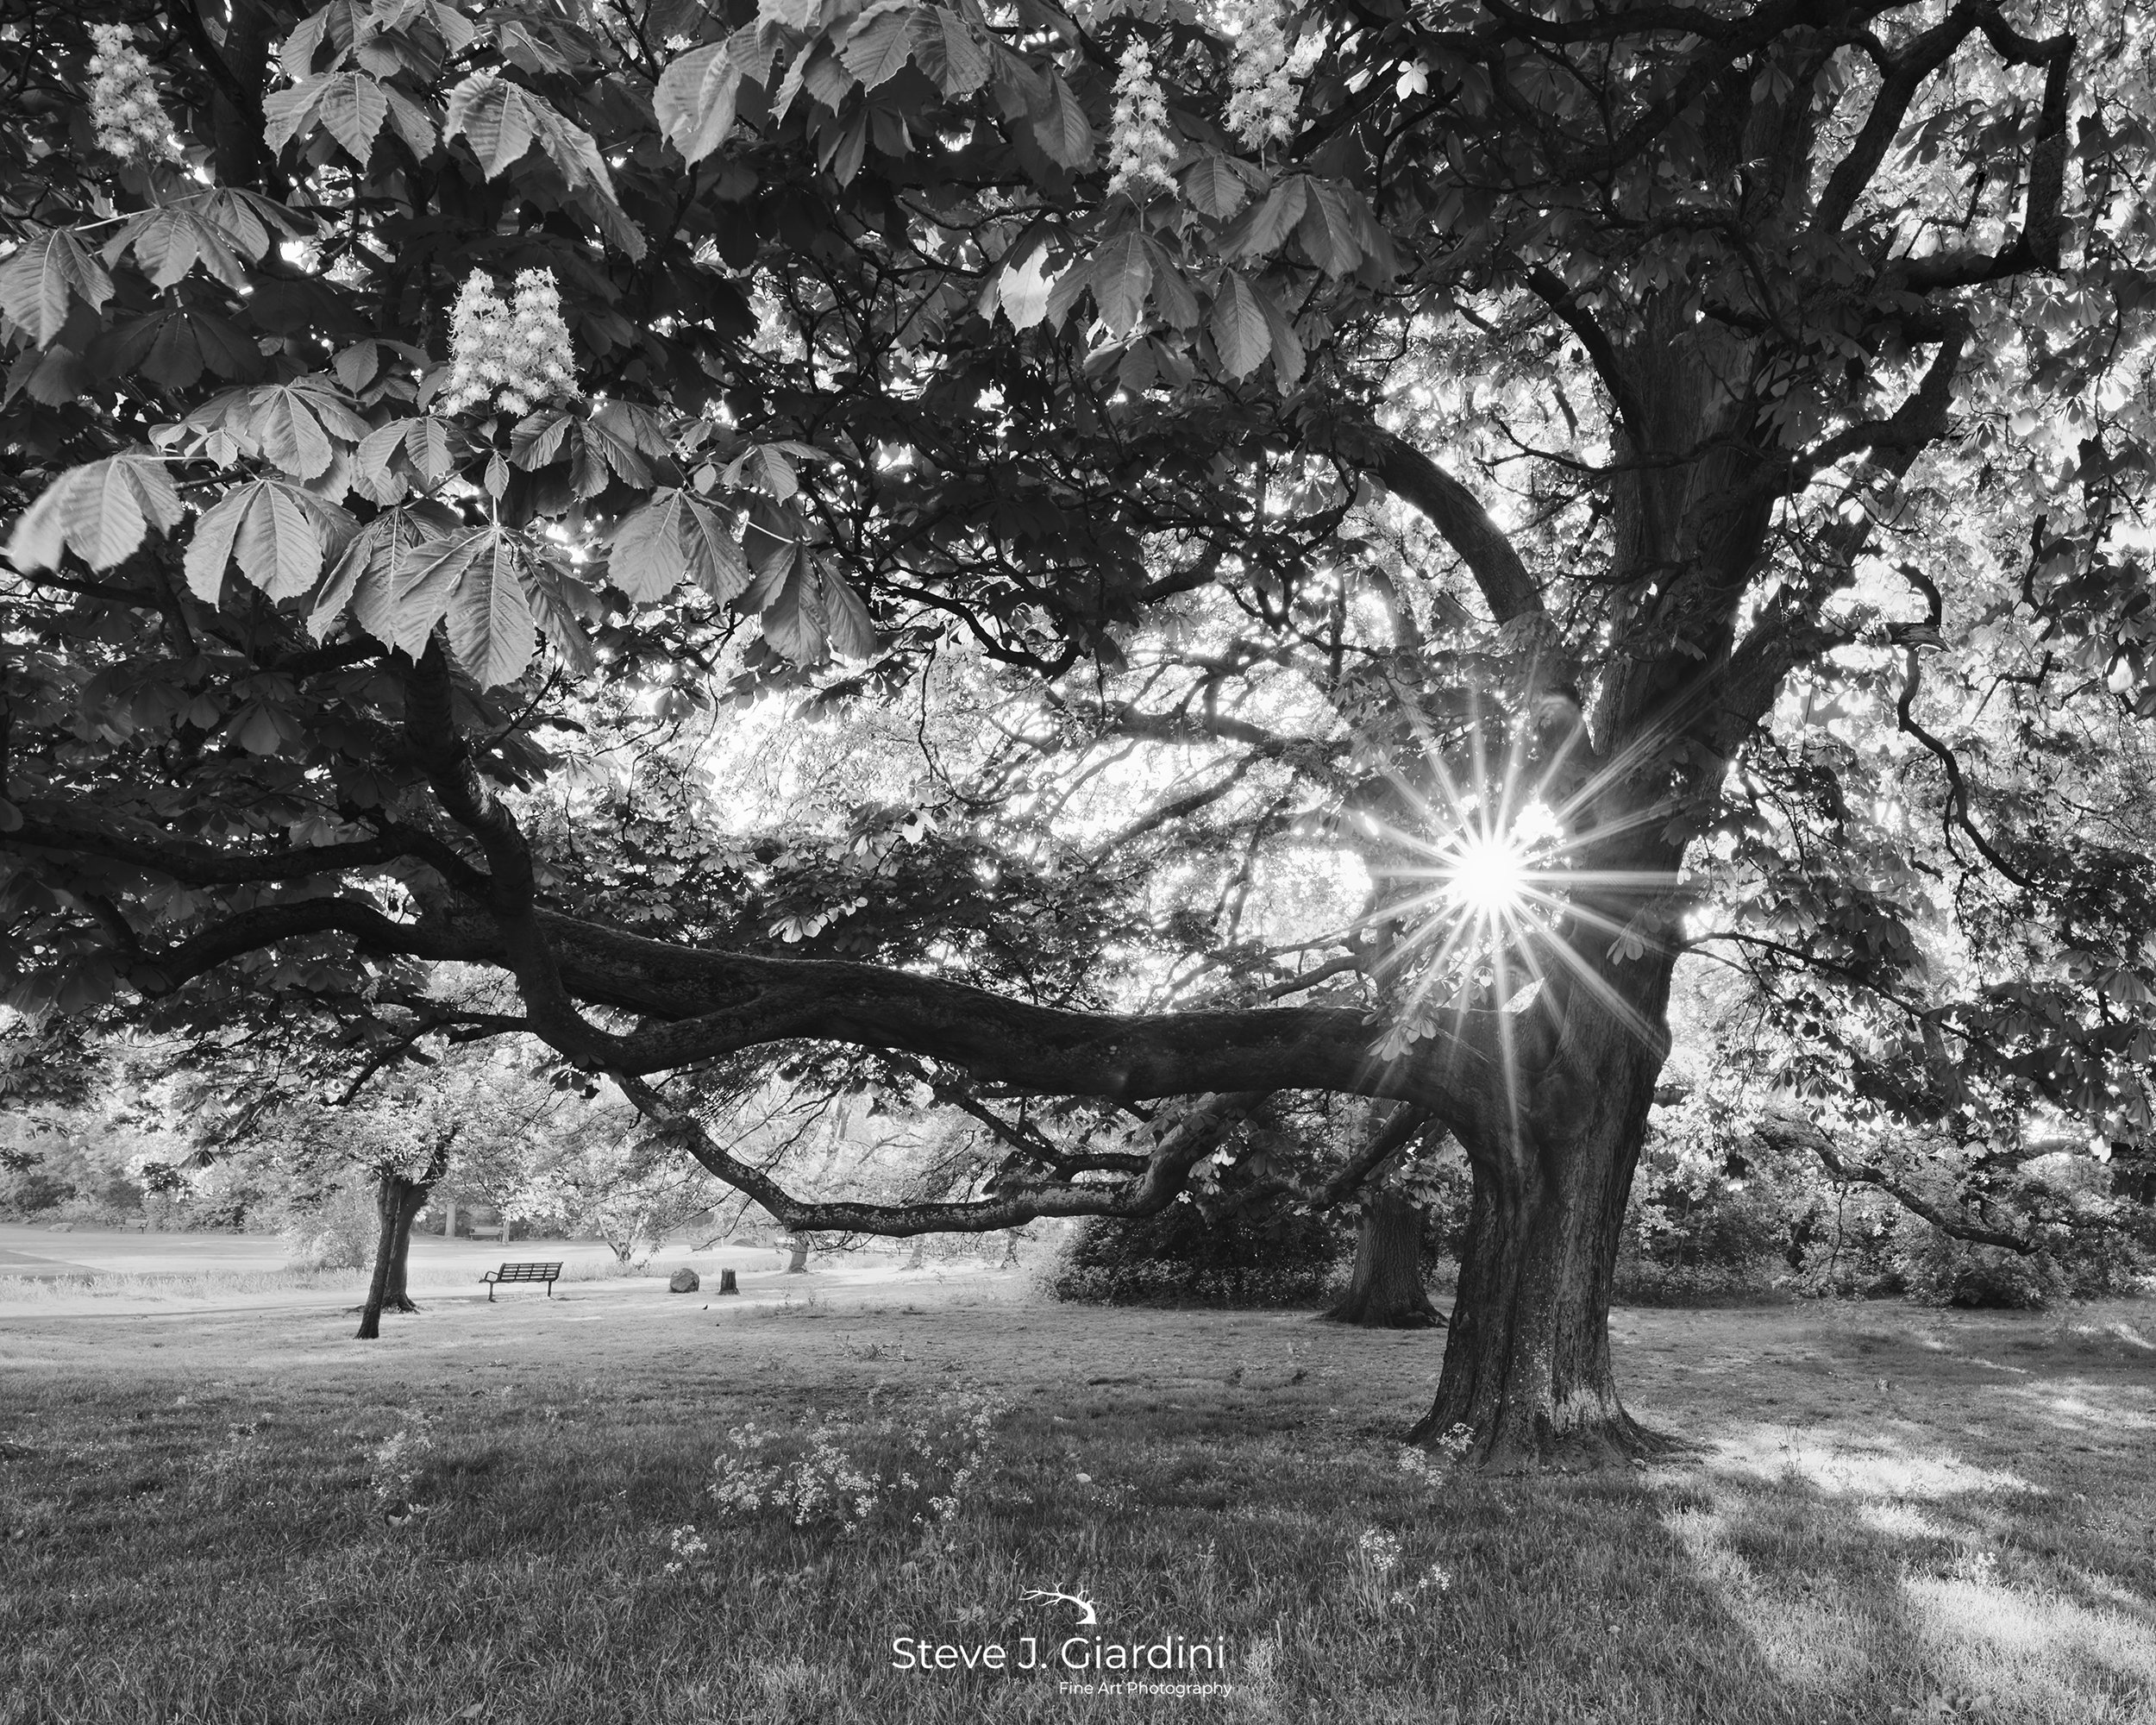
Image #7: Sunstar Tree 22023NWND850BW_5x4

Exposure: Nikon D850, Zeiss Milvus 18mm f/2.8, 1/8s, f/22, ISO 640
Editing Software: DXO PhotoLab 5, NIK Silver Efex Pro 3, Adobe Photoshop, TK Actions
Composition Goal: Creating sunstar images is something I mostly avoid. However, in this case I thought it would add context. I purposefully positioned my self so that the park bench was prominently visible. I also wanted the foreground leaves and flowers to consume a good portion of the top left of the frame.
Editing Objective: As in other images from this series it was important to me to display a full black and white tones. While the darker tones dominate, I did my best to make sure the flower and its surrounding leaves had gray mid-tones to set them apart from the brightest highlights and darkest shadows. I did dodge the dark spots in the top of the tree to separate the dark branches from the dark tree leaves.
Image #8: Vine Climb 22213NWND850BW_4x5


Exposure: Nikon D850; Nikon 24-70 f/2.8 @70mm, 1/60s, f/4.5, ISO 400
Editing Software: DXO PhotoLab 5, NIK Silver Efex Pro 3, Adobe Photoshop, TK Actions
Composition Goal: This is an image about the transition of sunrise in nature. The goal was to split the frame, divided light. On the right sunshine is dominant and on the left the shadow. In the middle sharp crisp vine leaves that ranged from mostly bright to middle gray to mostly dark.
Editing Objective: Image editing was all about creating sharp vine leaves and light and dark contrast. The challenge was making the mid-tone gray leaves on the brighter sunny side stand out as much as those against the dark backdrop on the left side. To do this I selected half the leaves vertically for both sides edited each for gray tone. I spent a lot of time making sure the zone between each side was feather so as not to reveal the edit.
If you made it this far through the photo review, congratulations! I hope you found it helpful. If you get a chance let me know your thoughts, helpful, good information, too much information, I think this would be a better format …………
Cheers
Steve